 Rescue Respiration
Rescue Respiration GUI
In order to control the ventilator we developed a intuitive GUI that displays the current ventilation parameters and plots the current pressure and volume delivered to the patient in each cycle.
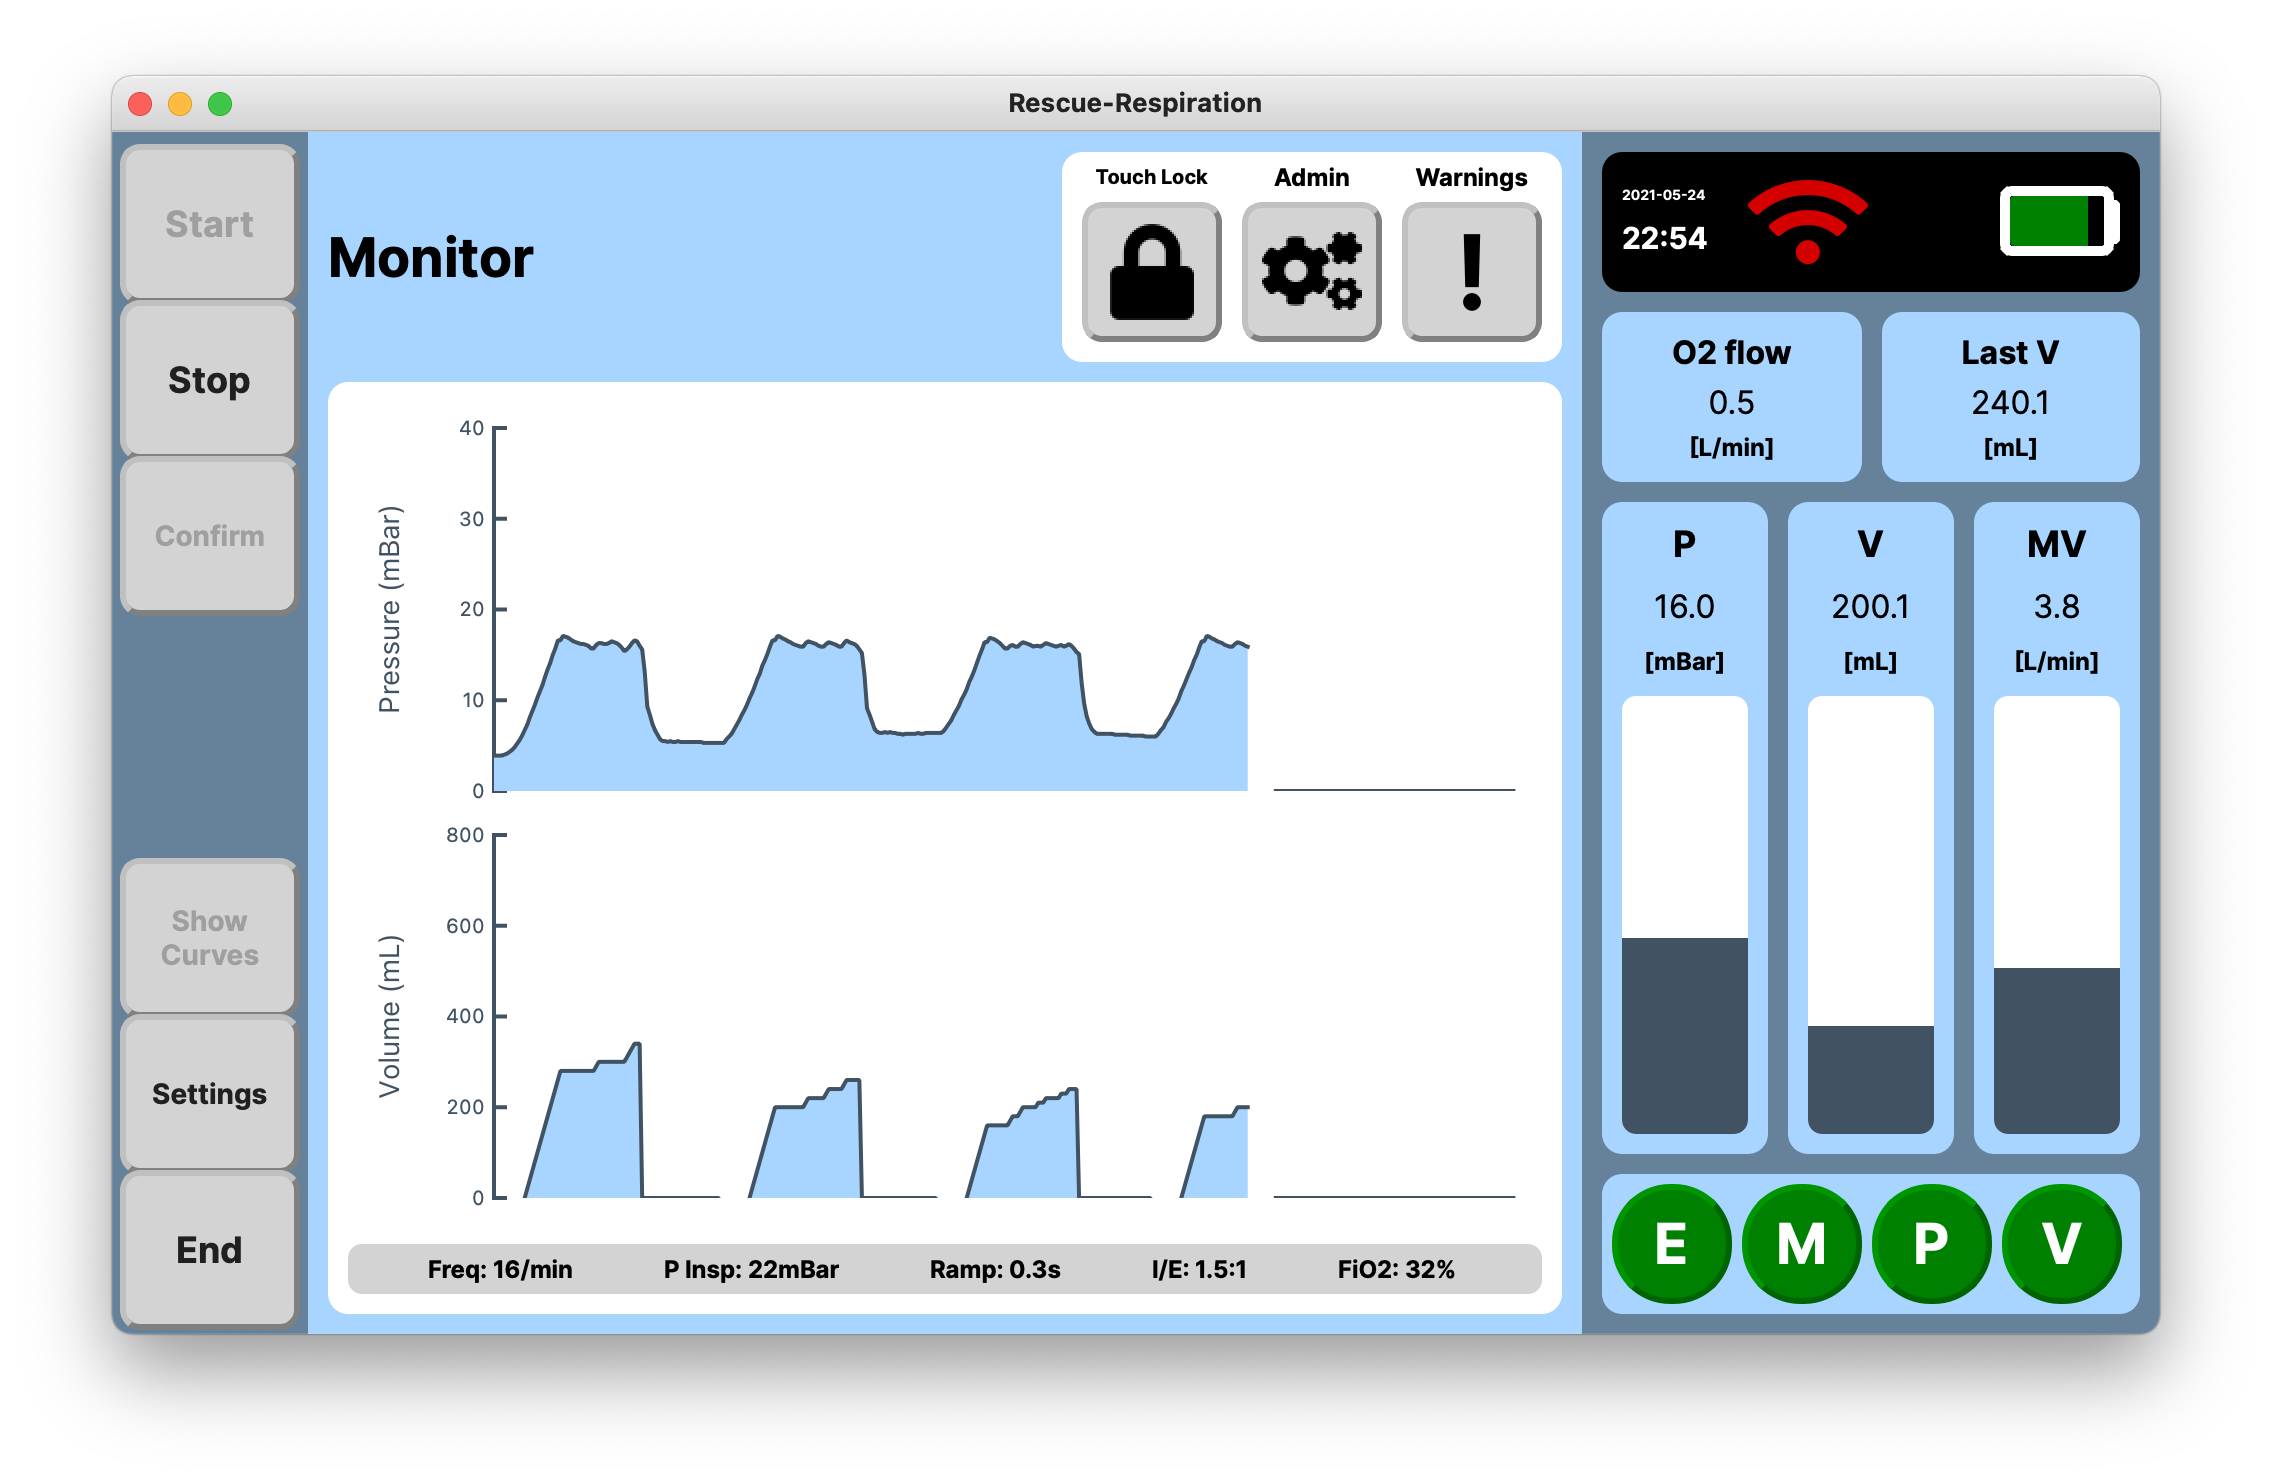
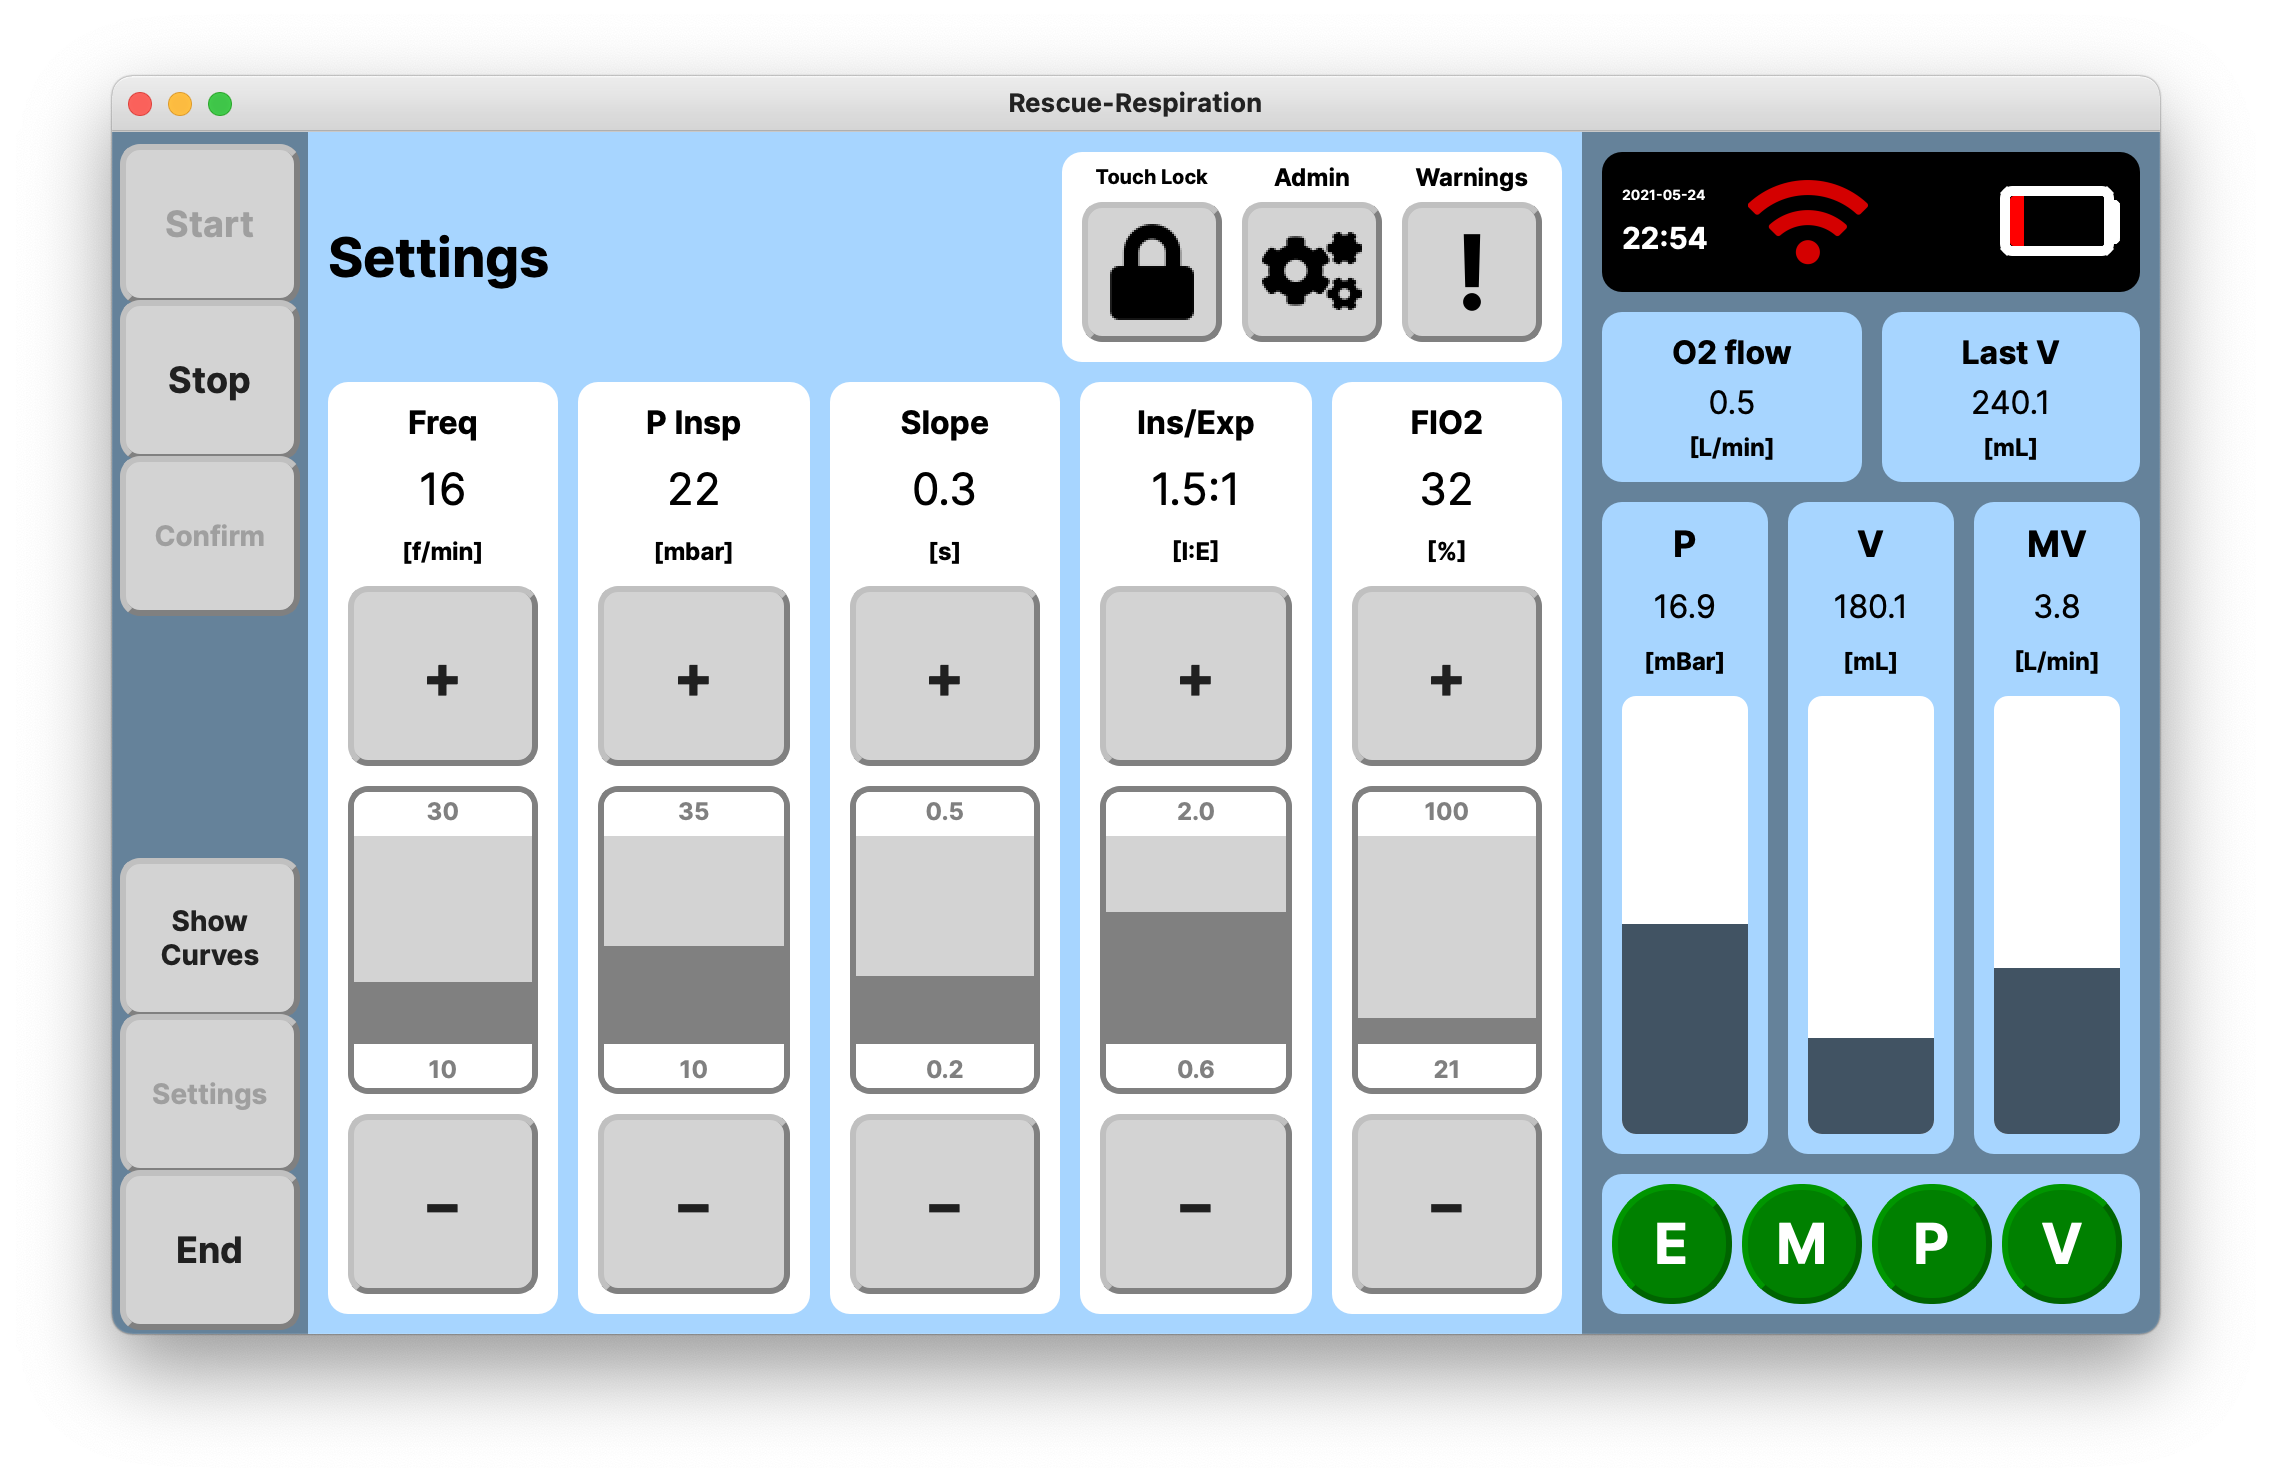
In this view one can see a all ventilation parameters. Medical personel can adjust them by pressing the buttons on the touchscreen.
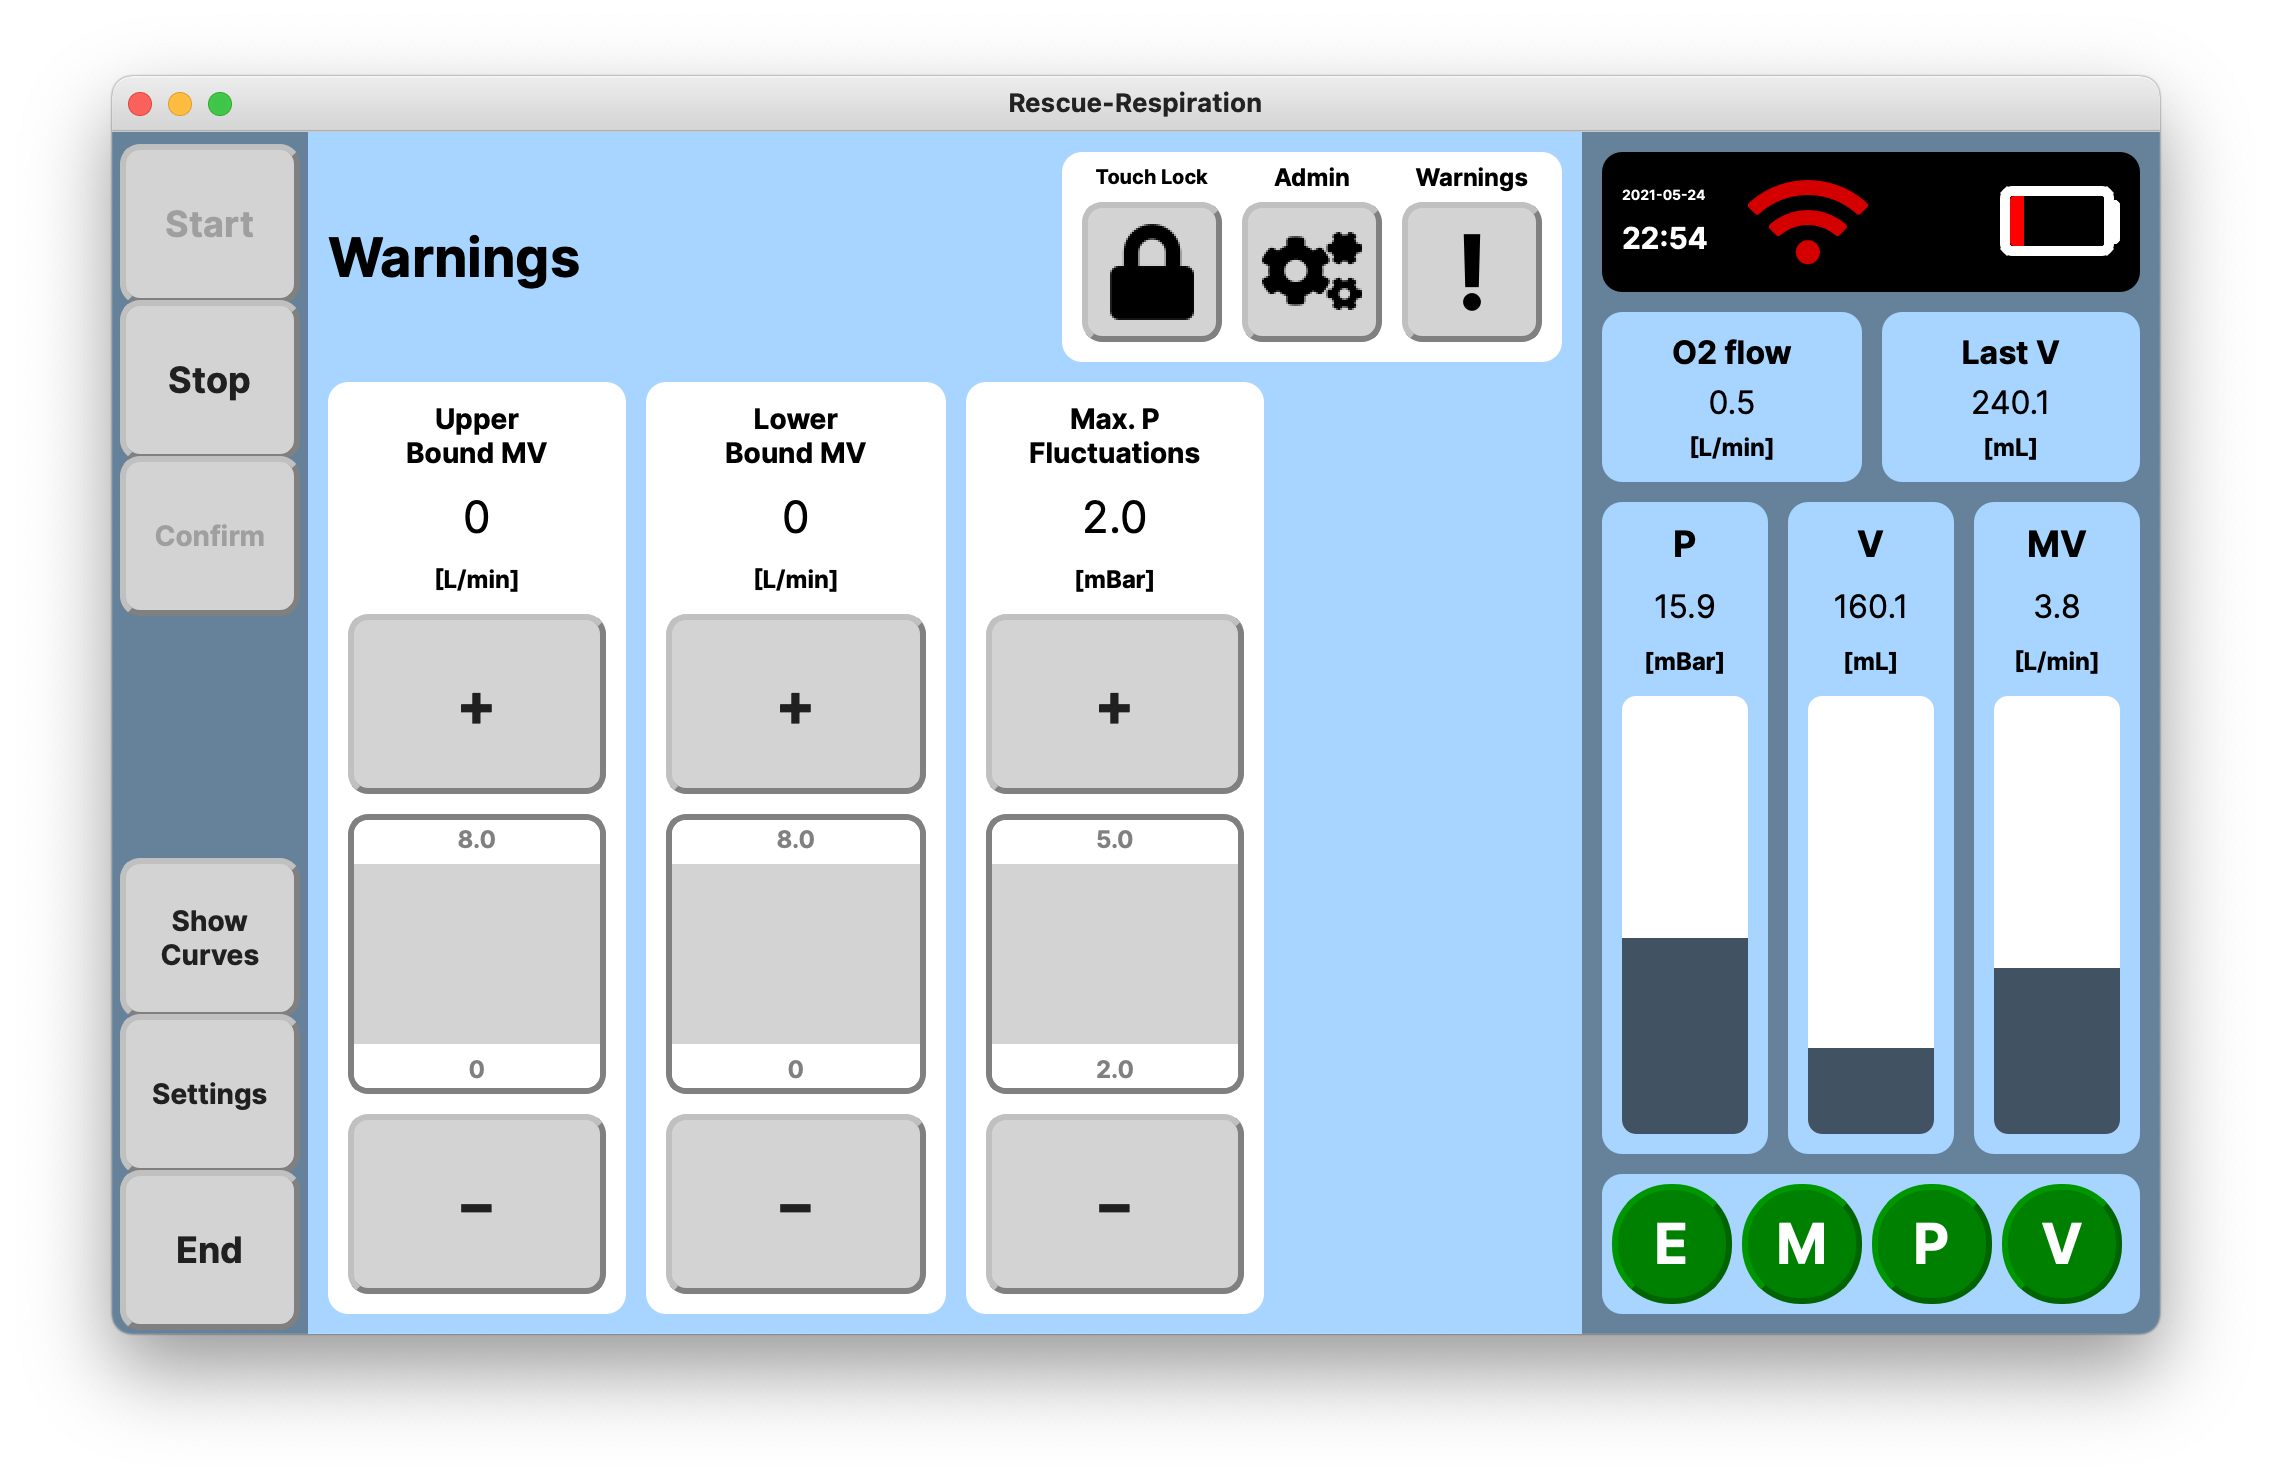
In this view, the medical personel can adjust the threshold values at which they want to be alarmed.
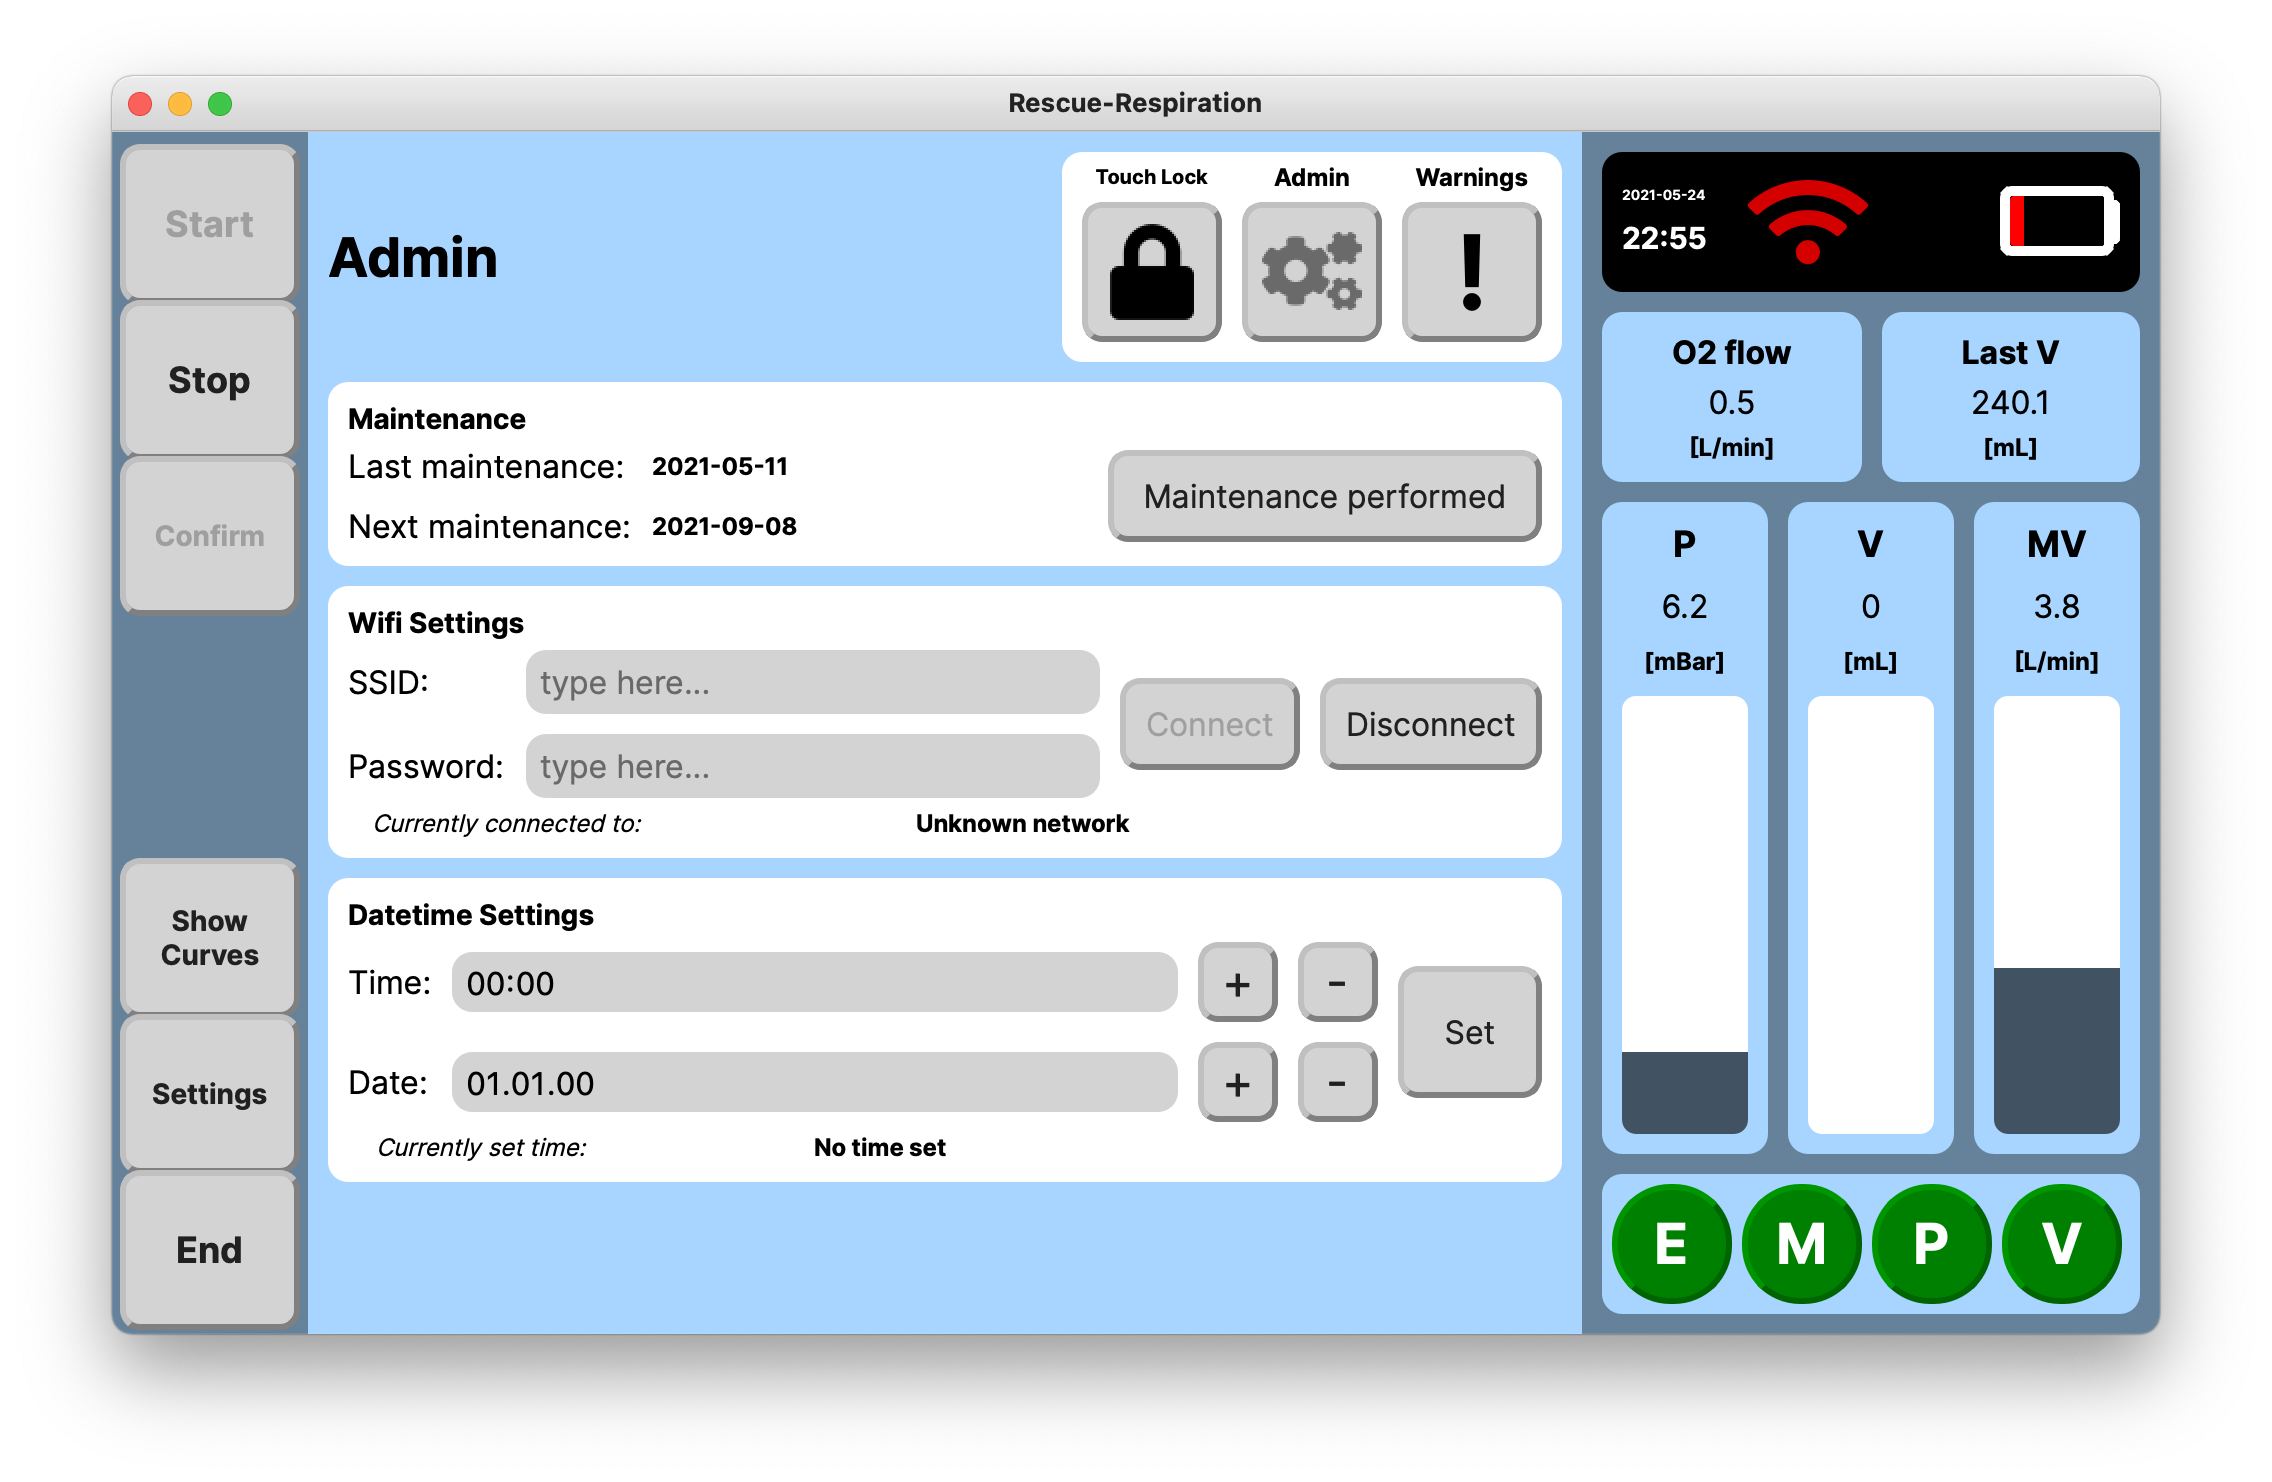
Before the device is deployed a few things have to be set from the UI. The network connection is only used when remote maintenace is requested.
Installation Instructions
We need to complete a few installation steps to configure the Raspberry to run our application in Kiosk-mode. This means setting up the system in such way that prevents user interaction and activities on the device outside the scope of execution of our application.
Based heavily on this blog.
Using Raspian Lite
Raspbian desktop is bloated. More important, the desktop is difficult to configure. We are therefore starting with a freshly burned Raspbian Lite SD card.
Set Up Raspbian-Lite with Network and SSH
We may want to use ssh inside our home network while debugging, even though the final application won't need a network. The easiest way to enable SSH is to mount the first partition: sudo mount /dev/sdX1 /mnt.
(sdX is wherever the card shows up on your machine, e.g. sdB) and create two files:
- An empty file named ssh, easily created using
touch /mnt/ssh. - A file named wpa_supplicant.conf with the settings for the local network:
ctrl_interface=DIR=/var/run/wpa_supplicant GROUP=netdev
update_config=1

network={
    ssid="MY-WIFI-SSID"
    psk="MY-WIFI-PASSWORD"
    priority=10
}
Then unmount that partition using sudo umount /mnt
Copying the application files
The second partition on a Raspbian card is the root filesystem, including /home/pi, the pi user's home dictory. Mount /dev/sdX2, copy the application folder or clone this repository into /home/pi, and chown the code to the pi user. Don't forget to first create a ssh key and add it to your GitHub account so the Pi is allowed to pull from the private repository.
Unmount the SD card and insert it to the Raspberry Pi.
Raspbian first-boot configuration
Boot the Pi with a monitor attached, log in as the pi user, run sudo raspi-config, and:
- set the locale and keyboard,
- change the password for user Pi,
- in Boot Options, choose “Desktop / CLI” and “Console Autologin” so the pi user will be logged in automatically.
To make sure the installation won't become too bloated, create the file /etc/apt/apt.conf containing:
APT::Install-Recommends "false";
APT::Install-Suggests "false";
Update the OS, and install the packages needed to run X, the Openbox window manager, a terminal (I used xterm in this example), and a text editor.
sudo apt update
sudo apt install xserver-xorg x11-xserver-utils xinit openbox xterm
If you're in a hurry, you can skip the following dist-upgrade step.
sudo apt dist-upgrade
Installing the application-specific dependencies:
We start by installing pip and the Tk bindings: sudo apt install python3-pip python3-tk
Then install the needed python modules matplotlib and pandas using pip: python3 -m pip install matplotlib pandas
Configuring Openbox
Start by creating the Openbox configuration directory: mkdir -p .config/openbox
Create a file .config/openbox/autostart containing:
# Disable screen saver/screen blanking/power management
xset s off
xset s noblank
xset -dpms

# Start a terminal
xterm &
Save the file, and test to make sure you can run X: startx
You should see a black screen, a mouse pointer, and after a few seconds, a small xterm window in the center of the screen. You can use the xterm to fiddle with things you want to change, or you can right-click anywhere outside the xterm window to get a menu that will let you exit X and go back to the bare console.
Getting rid of that pesky cursor and starting at boot:
As we are using a touchscreen, we want to remove that annoying mouse pointer arrow. Add this to your .bash_profile:
[[ -z $DISPLAY && $XDG_VTNR -eq 1 ]] && startx -- -nocursor
If you are stuck in the kiosk-view, you can still ssh-in from another machine and use killall python3 to force quit the application.
Installing the proper Display Drivers
We are using the 7inch HDMI Display-C-1024X600(MPI7002) which needs special drivers in order to work properly.
git clone https://github.com/goodtft/LCD-show.git
chmod -R 755 LCD-show
cd LCD-show/
Here we find a bunch of different drivers, but because we are using the 7inch variant with a 1024X600 resolution we need to select the apropriate driver.
sudo ./LCD7C-show
Python Requirements
python3 -m pip install --upgrade pip
python3 -m pip install -r requirements.txt
Numpy specific Requirements
sudo apt-get install libatlas-base-dev